Shallcross Kelvin-Wheatstone Bridge Model 638-R
Got It From eBay
This is a page about a measuring device the kind of which was once in much greater use than is now. The device is a tool to measure resistance, and quite precisely at that. The particular tool highlighted here is a Shallcross Kelvin-Wheatstone Bridge Model 638-R. I picked it up on eBay for about $45 delivered. It was advertised as working, which it really wasn't. And it was advertised as being in excellent condition, which again, it really wasn't. It was also advertised as having belonged to an older family member who had been a ham radio operator. I tend to doubt that claim as well. However, the meter was in a restorable condition, and that is exactly what I did, restored it.I regret not having taken pictures of it before I began to fix it. That's because, when I first started to clean it up, I had no idea I would work on it as much as what I did. But I do have the pictures that were on eBay. This is what it was shown to be when it was for sale:
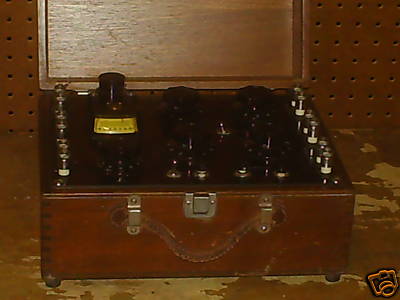
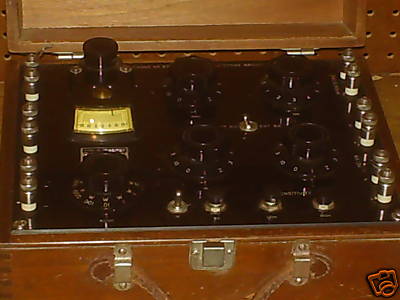
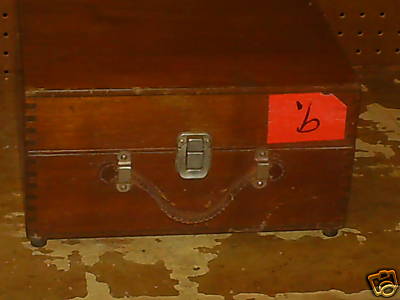
You cannot see how badly scratched and dinged up the oak case was. Nor can you see the corrosion on the hinges or latch. You can see the poor condition of the leather carrying handle. You can also see the day-glo sticker on the box that says to me "I'm from a surplus auction". What particularly was neglected to be included in the huckster's photographs was the side and bottom of the box where the batteries had leaked and eaten the vanish off as well as having eaten into the wood itself. What I will say for the piece though, is that the inside, where the dials and jacks are, was in extremely nice condition, even if it was a bit dirty.
The Restoration
Have another look at the second picture from eBay of this meter. I have enlarged the area I am referring to in that photo: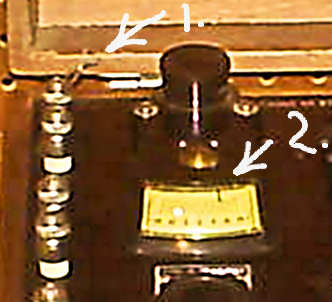
The point I have numbered '1' is where a couple of wires were coming out of the empty hole supposed to be filled by a screw. When I took the top plate off I discovered that someone had broken a connection inside and soldered these two wires to the opposite sides. Then they pulled them through the screw hole and threw away the screw. And a poor job it was too. Why would someone do this? I can only speculate, but I think it has to do with the galvanometer. Look at the arrow I labeled '2'. It points at the galvanometer. When the meter arrived, the galvanometer needle would not travel all the way across its scale. It was binding on something. I suspect that the previous owner couldn't figure out how to fix the galvanometer and pulled these wires out to be able to attach his own meter. Foolish! Even with a non-functional galvanometer this tool should have been able to have been used. There are a couple of thumbscrew contacts marked "GA" on the surface that are designed to allow the attachment of an external galvanometer.
What Does it Look Like Now?
Here are a few pictures that show the results of the work done. After I got these into place, I saw that there really was more work to do on the meter. This being my first (kind of roundabout way) attempt at restoring something has taught me a few tricks and ideas that will work better than this first attempt. That said, this does look many times nicer than when I started.Shallcross 638-R Kelvin Wheatstone Bridge - View from Above
)
Click picture to enlarge
In the next picture you can see to the upper right side of the plate here, a circular area that is a somewhat different color thatn the other wood. That is due to the fact that someone had left some batteries in the meter for (who knows how many) years and they had leaked. The battery leakage had eaten deeply into the wood. The wood stain color was all gone and the shellac of course, was totally gone. The inside of the box, fortunately had more damage than the outside. Inside I had to use plastic wood to rebuild a couple of spots. The phenolic battery holder inside was fine, but the screws that held the rear metal clamp to the floor of the inside had no wood to grip as it had been eaten away too. The corrosion also bled through to the bottom of the box, which is shown in a different picture.
Shallcross 638-R Kelvin Wheatstone Bridge - Battery Damage
)
Click picture to enlarge
The corrosion from the leaking batteries had eaten away the color and shellac from the bottom of the box near each end of the battery holder. Here too that defect had to be fixed. After I cleaned away the loose particles of wood and cleaned off the surface, I needed to re-stain the wood. What I did to get the color back was to use Kiwi brand brown shoe polish. Don't laugh; it worked well! As a matter of fact, I ended up using shoe polish to polish the entire box before I was through. The color nicely matched and filled in the scratches. Once done, the wax remaining behind is a great protectant. As I no longer own any brown shoes that need polishing, this was an admirable use of a product that otherwise had little purpose for being in my closet.
To get shellac back on the surface, without having to redo the entire side (I played it pretty lazily I suppose) I masked off the area that didn't need new shellac and worked on the areas that did. I used a clear polyurethane spray that took a couple of hours between sprayings to dry. Then I used a fine 600 grade sandpaper to try and smooth out the ridges between the masked and non masked areas. (There were decidedly high ridges from the polyurethane layers built up.) I used ethyl alcohol (Everclear - also good for drinking... if diluted a bit) along with some fine steel wool to smooth out and make flow the shellac and polyurethane. I won't claim to be a master at this yet, but it does seem to work moderately well.
Shallcross 638-R Kelvin Wheatstone Bridge - Under
)
Click picture to enlarge
The front was where we saw the day-glo sticker. I removed it with Goo Gone - another great product for restoration. It has some kind of citrus extract in it dissolved in a petroleum distillate base. It removes all kind of gummy stuff. It did not hurt the finish at all, but you do need to test it on each surface on which you work, unless you like surprises.
You may notice (or you may not, but I finally did) that the latch is on upside down. This was how it was when I got it. But as I started looking at more of these meters, I saw that it was supposed to go the other way. I have since fixed that, but it isn't shown here.
The handle still looks to be in pretty rough shape. It looks a bit less ragged than it did as I trimmed off the threads that were loose. I also repaired the center part of it where the old dry leather was about to break in half. I cut a small rectangular piece of plastic from a one liter PETE soda bottle. That is some tough stuff! I used super glue to hold that little rectangle in place between the two strips of leather that had been sewn together. It was bonded to both pieces. It did two things; first it bound the two leather pieces to give strength as they didn't have much in the thread department holding them together any more, and second, it was glued to both sides of the leather where it was parting.
Shallcross 638-R Kelvin Wheatstone Bridge - Front
)
Click picture to enlarge
Shallcross 638-R Kelvin Wheatstone Bridge - Left
)
Click picture to enlarge
The right side is where the little Bakelite plate is. If you take out the two screws, one on either side, the plate comes loose, not entirely off though, and you can slide three 'D' batteries into the battery tube. The plate isn't entirely free as the center metal rivet you see on it is soldered on the inside to the wire that carries the current to the circuit. This is an unwieldy solution but is the way it was designed.
Behind the plate is a quarter (coin) between the rivet and the battery positive pole. That is what I found when I got the meter. And as I found out when I tried to reassemble the meter after putting new batteries in it, the quarter, or a washer, or some metal spacer is needed. The tension provided at the rear of the battery tube is not great enough to ensure proper contact without it.
Shallcross 638-R Kelvin Wheatstone Bridge - Right
)
Click picture to enlarge
There is still something not quite right with the hinges. Oh the hinges themselves are OK I think. It is just that they may not be placed exactly where they should be. When I close the lid, there is still probably an eighth inch gap or so between the lid and the body of the box at the front. It it easy enough to pull the lid down to flip the clasp to close it, but this doesn't seem correct. One more thing to work on here...
Shallcross 638-R Kelvin Wheatstone Bridge - Bottom
)
Click picture to enlarge
The galvanometer works now. It just cannot be "clamped" by using that little brass button on the top of the meter. Its intended purpose is to be slid in the direction of the arrow to bind the meter needle in place for safe transportation purposes. When I "fixed" the meter, I did not understand the purpose of the button. I wasn't sure if it turned, pulled up and turned or really just how it was supposed to move. I had no idea it actually slid. So before I found out how to safely disassemble the meter, I had removed the screws next to the button and I think in doing so I lost a spring. It seemed like a tiny one jumped out, but I could never find it. Even if I had, I am not sure how it fit into place to make the button work.
All I knew was that the meter needle would not go past the center, but would go to the left. When I got it apart, I was able to tweak the tiny metal parts inside to get the needle able to cover the entire scale and end at rest in the center. I have since (maybe temporarily maybe not) replaced that meter with another fully functional, but not as cosmetically nice one from a similar Shallcross meter.
Shallcross 638-R Kelvin Wheatstone Bridge - Galvanometer
)
Click picture to enlarge
How Do You Use This Meter?
That was the $64 question when I first got it. It had no instructions. I (embarrassed to admit it but true) did not understand how a Wheatstone Bridge worked. After I studied the concept, and was able to use some instructions I saw on line somewhere for a different brand of Wheatstone Bridge meter, I was awed with the theory of operation and with the meter I had in front of me. I have another page (well I will eventually) on the details of a Wheatstone Bridge.Any bridge circuit operates by comparing some aspect of one portion of a bridge circuit to another. A resistance bridge compares voltage drops in two arms of a circuit. A galvanometer is hooked across the middle of the two arms. If the voltage drops at the connection points in the two arms are the same, no current flows through the galvanometer. The needle will sit in the center which indicates no current or a "Null" condition. The dials are turned to add or subtract resistance until the meter does not move when battery voltage is applied. Then the resistance is read directly from the dials.
It takes extraordinarily little current to move a galvanometer. By using high precision components in the Wheatstone Bridge circuitry, it becomes possible to determine resistance at an accuracy level otherwise unobtainable.
A f'r instance here: This Shallcross Kelvin-Wheatstone Bridge is able to measure small resistances down to probably 1/1000th
 . It has an accuracy (at least as far as one of Shallcross' 1944
advertisements would have you believe) of 0.3% when measuring resistances between 1
and 1M.
. It has an accuracy (at least as far as one of Shallcross' 1944
advertisements would have you believe) of 0.3% when measuring resistances between 1
and 1M.
I became a believer when I decided to test some of the low resistance indicator ability of the meter. First I had to find a suitable benchmark. I had a 42" piece of 14 AWG copper wire left over from something I was working on. Wire resistance is well documented. I looked up the resistance of 14 AWG copper wire in the Wire Resistance chart I have on another page here. At 20° C this gage of wire has 2.525
per 1000 ft. This works out to 8.8 milliohms for the
wire I had. When I tested the wire, I received an indication that it was about 14 milliohms. That was fairly impressive to me. Yes it seemed to be off by
quite a high percentage, but still to have something tell me within 6 milliohms the resistance of a wire seemed amazing.
But wait... there's more! The more I thought about it, the more dissatisfied I became. This did not seem to be such a great tool to me, if it couldn't get any closer than that. Maybe the years had thrown its resistances out of tolerance. Maybe someone had abused it in some manner that I was not aware. Then it dawned on me. A few thousandths of an ohm? It wouldn't take much dirt to amount to that. Maybe my connections weren't good enough.
I got the 600 sandpaper and went after the ends of the copper wire. Then I cleaned the thumbscrew contact surfaces where the resistances are to be put into the meter circuit for testing. Sandpaper and alcohol were my tools. I reconnected the wire and tried again. Using the .001 ratio range, the meter told me the wire measured .009
. How about that! Practice tied out with theory! At
that point I recognized the meter for the quality instrument it was (it still was - after 65 years). Those Shallcross boys made a fine instrument.
I have used the meter several times already to get excruciatingly accurate measurements. You simply cannot get this level of accuracy or precision with a digital ohmmeter (at least not with one I can afford to purchase). Not being in the industry, I don't really know the level of use of these types of meters. I would have to believe that modern ones must be being utilized in cases where accurate measurements are required. But I also wonder where those meters will be 65 years after they were manufactured.